Re:RemGameplayCamera from zero
Preface
This page is a simple and clear tutorial for RemGameplayCamera plugin
It would cover the very basics you need to use the plugin
Hope you will like it
(I will continue to improve this page, and any feedback or contribution is welcomed)
Introduction
RemGameplayCamera plugin is a data-driven gameplay camera system for unreal engine projects. It provides a state based(tag based), modular, prioritized camera data configuration with data asset, support real time editing
Built on top of the existing camera framework make it full compatible with camera sequence, camera shake, view target switching and other camera effects.
It’s AActor based, so any actor class could use it (UAbilitySystemComponent is required for now).
With built-in camera location, rotation smoothing (lag) and many other mechanisms, you can easily implement camera system like what’s in ALS or Lyra by just tweaking the camera configurations without writing a line of code.
It also come with some basic functionality for free look, enemy lock, mesh fading gradually and post processing management, with extensibility in mind.
The camera data processing pipeline is divided into several parts, every part of these could be extended with blueprint or code!
You could easily implement something like speed based fov, speed based camera offset.
Note: (currently) It rely on the ability system component from the view target to provide gameplay tag event-driven camera data update, in this way, it’s also loose-coupled with the rest of the game world.
0. Starting from Third Person template
Not actually from zero😀, I will guide you to do a simple walk through on the RemGameplayCamera system by trying to replace the default camera in the “Third Person Template”.
1. Copy files in Config directory into your project
Assuming you’ve created the Third Person project and put RemGameplayCamera plugin in place.
Please copy RemGameplayCamera/Config folder to YourProject/Config folder, these are the default GameplayTag configs for the system. It will register these default tags into the system, and get the URemCameraSettings object configured.
You could check it by navigating to Project Settings -> Game -> Rem Camera Settings after opening the editor. And customize it if you want.
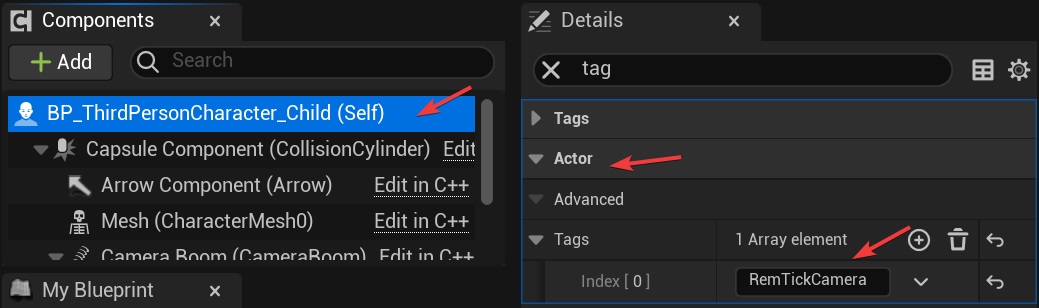
2. Option-in the third person character
By Default, the “rem camera system” is disabled for every view target.
View target actor that wants to use the system should have RemTickCamera in their AActor::Tags property to be able to get identified.
So, go ahead and open BP_ThirdPersonCharacter, and add it from the detail panel:
3. Create essential files
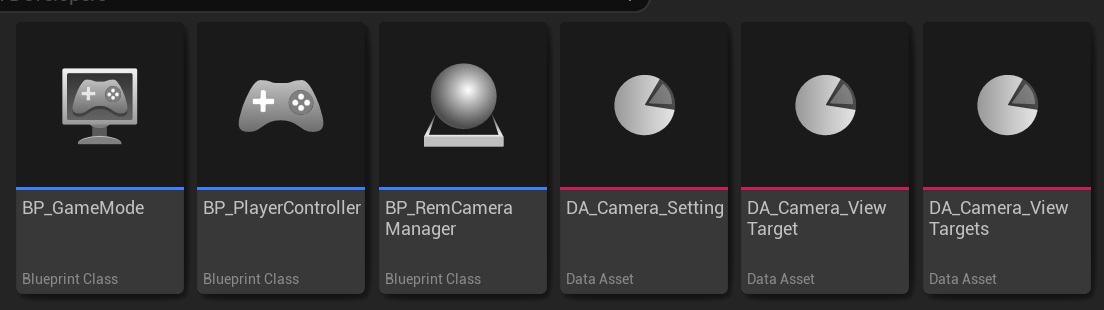
In order to use the Rem camera system, we need to use the ARemPlayerCameraManager and prepared the “camera data” for it.
create BP_RemCameraManager
So, first, let’s create this camera manager blueprint named “BP_RemCameraManager” that derived from ARemPlayerCameraManager class. It’s this class that coordinate the camera system.
create BP_PlayerController
In order to utilize the BP_RemCameraManager, create a player controller blueprint named “BP_PlayerController” that derived from APlayerController and assign “BP_RemCameraManager” to it’s Player Camera Manager Class property:

create BP_GameMode
In order to utilize the BP_PlayerController, create a game mode blueprint named “BP_GameMode” that derived from AYourProjectNameGameMode and assign “BP_PlayerController” to it’s Player Controller Class property:

create camera data files
BP_RemCameraManager need camera data to work as expected.
Camera data is organized by a simple hierarchy:
URemCameraSettingForViewTargetshas all the camera settings for all the view targets in the game. Referenced by theARemPlayerCameraManager. It’s the top or root node of the hierarchy.URemCameraSettingAssetsForViewTargethas camera settings forakind of view target. Referenced by theURemCameraSettingForViewTargets.URemCameraSettingAssetis where the actual camera setting values resides. Referenced by theURemCameraSettingAssetsForViewTarget.
create DA_Camera_Setting
First, we create a data asset named DA_Camera_Setting of type URemCameraSettingAsset,
copy these value and paste into State Query property:
1
(TokenStreamVersion=0,TagDictionary=,QueryTokenStream=(0,1,6,1,1,0),UserDescription="",AutoDescription=" NONE(  ANY( ) )")
this will make the tag query always matching, letting the camera setting asset we create take effect.
Normally, this should match specific view target
statewhich is represented asgameplay tag
then, copy these value and paste into Setting Values property:
1
((Comment="CameraSettingValue.CameraTransform.Location.Offset",SettingTag=(TagName="CameraSettingValue.CameraTransform.Location.Offset"),Value=/Script/RemGameplayCamera.RemCameraDataLocationOffset_Fixed(Offset=(X=280.000000,Y=0.000000,Z=0.000000))),(Comment="CameraSettingValue.Fov.Value",SettingTag=(TagName="CameraSettingValue.Fov.Value"),Value=/Script/RemGameplayCamera.RemCameraDataFov_Fixed(Fov=90.000000)),(Comment="CameraSettingValue.PivotTransform.Value",SettingTag=(TagName="CameraSettingValue.PivotTransform.Value"),Value=/Script/RemGameplayCamera.RemCameraDataTransform_MeshTransform(SocketName="spine_05",Offset=(X=0.000000,Y=0.000000,Z=0.000000))),(Comment="CameraSettingValue.Trace",SettingTag=(TagName="CameraSettingValue.Trace"),Value=/Script/RemGameplayCamera.RemCameraDataTrace_Collision(TraceRadius=15.000000,TraceDistanceRatioInterpolationSpeed=10.000000,TraceStartLocationAlpha=(Curve=(),BlendTime=1.000000),TraceStartTransform=None)),(Comment="CameraSettingValue.CameraTransform.Location.Blend",SettingTag=(TagName="CameraSettingValue.CameraTransform.Location.Blend"),Value=/Script/RemGameplayCamera.RemCameraDataBlendAlpha_Blend(Blend=/Script/RemGameplayCamera.RemCameraAlphaBlend(Blend=(Curve=(),BlendTime=1.000000)))))
these values tries to mimic the spring arm settings on BP_ThirdPersonCharacter.
create DA_Camera_ViewTarget
Now that the setting asset is ready, we gonna create another data asset named DA_Camera_ViewTarget of type URemCameraSettingAssetsForViewTarget. It specifies the setting assets to use for our character.
For the View Target Tag Query property, we would use the same value up there👆 as DA_Camera_Setting::State Query as we simply want it to be matched and used.
Normally, this should match specific view target
identifierwhich is also represented asgameplay tag
then add an element in SettingAssetsForStatesData, add the DA_Camera_Setting to it’s SettingAssets property
(bUseSettingAssetsGroupsis a relatively advanced feature that’s added recently,we’ll ignore it here,let it be unchecked,so we could use the simpler one as opposed to it. See detailed explanation bellow if interested)
create DA_Camera_ViewTargets
Finally, we create the last data asset named DA_Camera_ViewTargets of type URemCameraSettingForViewTargets. It has all the camera data about every view targets in the game.
Add the DA_Camera_ViewTarget to it’s Settings for View Targets property, that’s it.
Last but not least, assign DA_Camera_ViewTargets to the BP_RemCameraManager::CameraSettingForViewTargets property.
4. PIE, start!
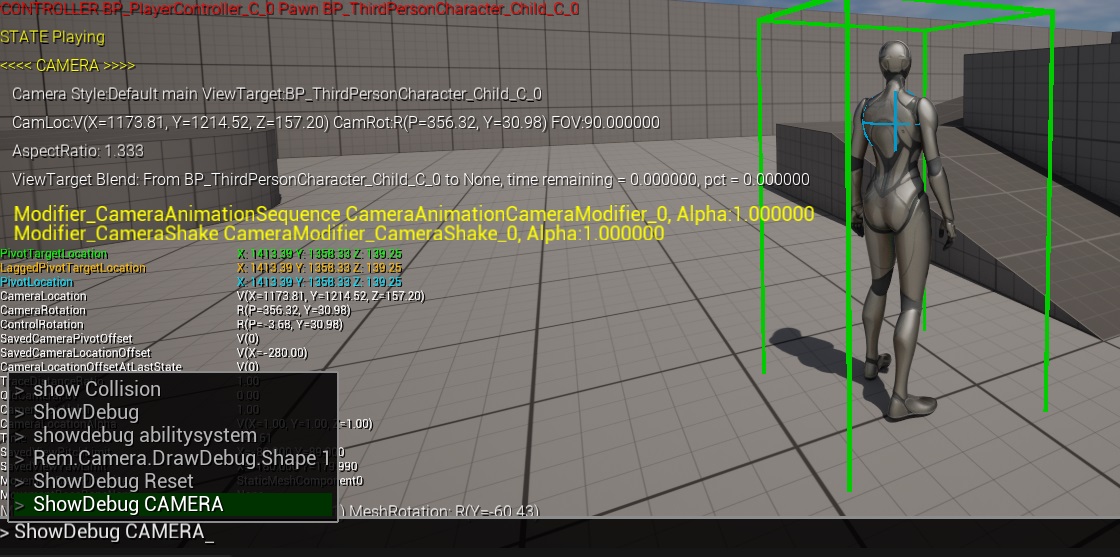
After changing the game mode to BP_GameMode, and hit Play
You may find the camera following character’s spine movement, more visible when it landing. And the camera has a smoothing effect when getting away from a colliding object (ALS like).
After typing the console command Rem.Camera.DrawDebug.Shape 1, a blue sphere would show up around the spine of the character indicating the Pivot Location which is the same with ALS.
5. Congratulations
thanks for your time
♥
Want to know more ?
How the camera location get calculated
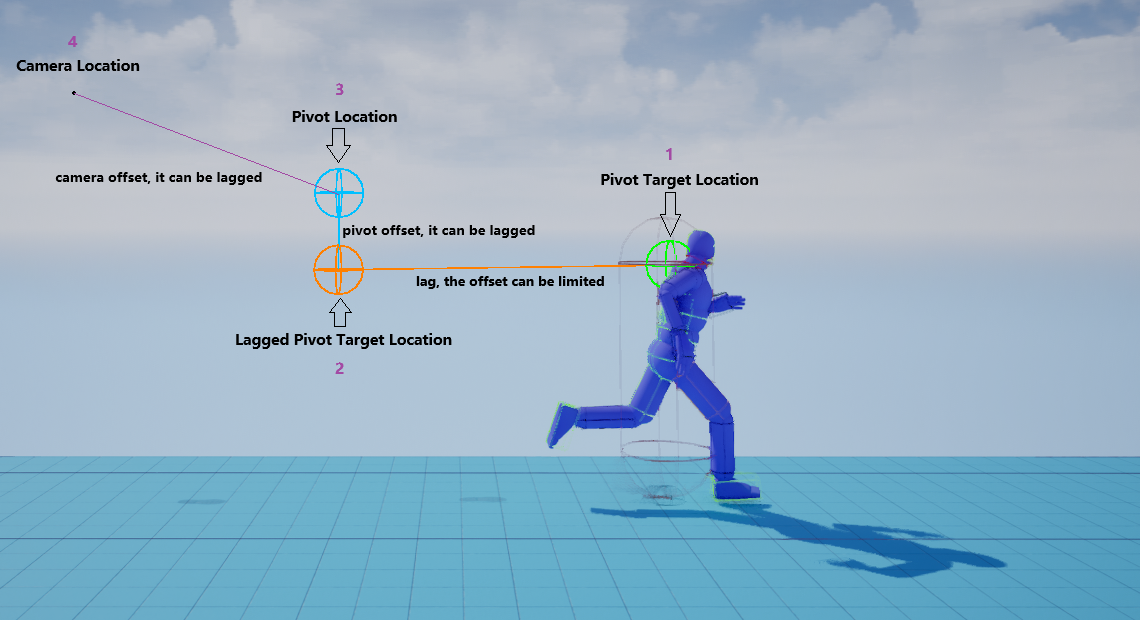
This👆 image contains terms that is crucial to understand the system, anytime feeling confused, you can refer to it or asking for help in our group.
Every piece of the data that is needed by the camera pipeline could be extended.
There are also many built-in functionalities for you, feel free to explorer it!
For more information, please look at the tooltips of properties on
URemCameraSettingsandFRemCameraSettingTagValue
SettingAssetsForStatesData a subdivision of configuration for a kind of view target
Prior to the 3.2 release, there was one and only one set of camera configurations in the configuration of a view target
When view target has different camera configurations in different states, it is necessary to include all camera configurations, which is difficult to maintain and use
It is now possible to configure the set of camera configurations separately for each combination state. When the combination state changes, the configuration is automatically switched, thus solving the above two problems
For example, instead of having all the camera configurations for all the movement modes in one array, you can configure a set of configurations for each movement mode.
Of course, no one is stopping you from doing that, but apparently the later is better in the long run
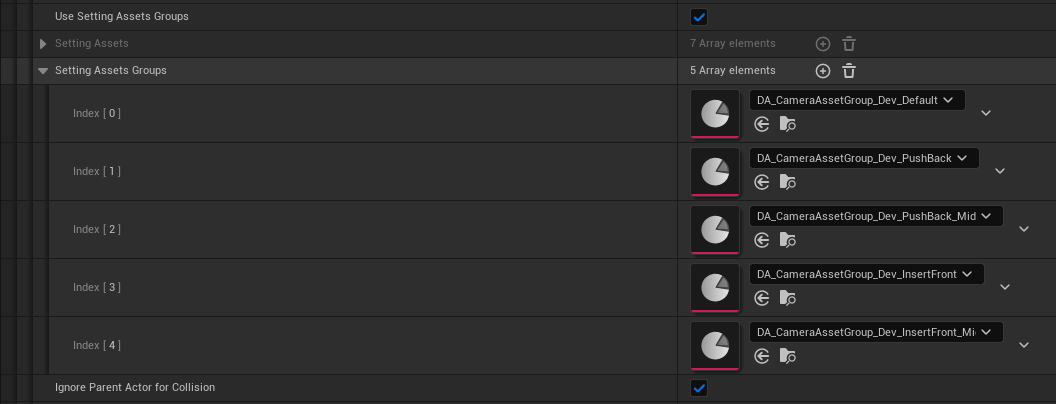
Get bUseSettingAssetsGroups checked to use the configuration grouping feature
In version 3.2, I added the SettingAssetsGroups property to SettingAssetsForStatesData to support reusing camera configurations in different states for the view target
Using the URemCameraSettingAssetGroup type, the camera configurations are freely combined to get the desired set of Camera Configurations
Each Configuration Group can choose to add a subgroup of camera configurations to the front or back of the current set of camera configuration, or any specific camera configuration asset
Modify the engine to support camera data type filtering
Need to contact me to get access to the source code repository, because it is required to modify the code of both the engine and plugin
follow the steps:
- apply the
patchfrom the root directory of the repository to the engine - edit the
REM_ENABLE_CAMERA_DATA_DROP_DOWN_FILTERmacro in the plugin code totrue
to get automatically data type filtering according to the selected camera setting tag

as you can see, only the data related to transform is listed